


Water Features Installation
Download this installation manual as a .pdf
Concrete or Masonry Surfaces:
If any form oil is present or suspected, wash with muriatic acid to produce etching, score surface with a wire brush, and rinse thoroughly with clean water, allow to dry. Ideally, use water under high pressure to wash and sandblasting to etch surface.
If any paints or sealers are present they must be removed entirely. All surfaces must be adequately washed and dried to ensure surface is free of dust and dirt.
Concrete Surfaces Protected With a Waterproof Membrane:
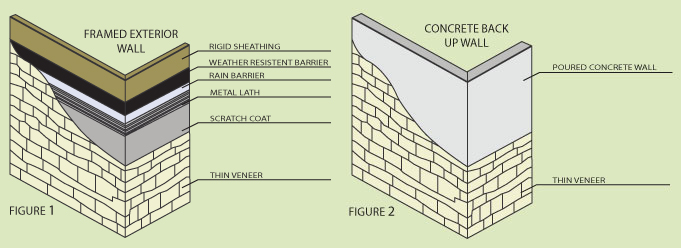
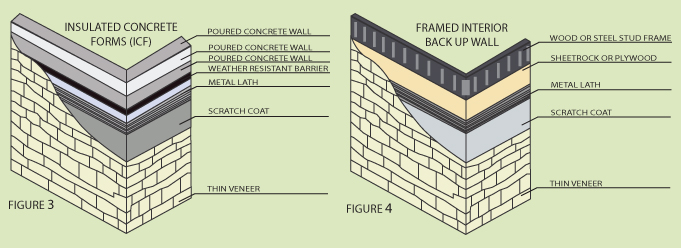
If the stone must be applied over any liquid, oil or tar based painted on waterproof membrane, under no circumstances should mortar or stone be directly applied to the surface. Install a weather resistant barrier overlapping joints a minimum of 4 inches and sufficient enough to prevent contact of mortar to the painted surface. Then install code approved metal lathe overtop of the surface with galvanized nails or fasteners, to a depth of 1 ½ inches or as acceptable by the local building code, to a maximum of 6 inches apart in any direction. Ensure that no residue from the waterproofing agent is present on the surface of the lathe*.
Wood Surfaces:
Always ensure that the surface the stone is to be applied to has been installed properly and according to code.
Install a layer of code approved weather resistant barrier overlapping lap joints a minimum of 4 inches. Install code approved metal lathe with galvanized nails or screws that penetrate a minimum of 1 ½ inches into the wood. Space nails or screws a maximum of six inches apart in any direction. Use a nail or screw of suitable length to obtain a depth of at least 1 ½ inch into the stud when attaching over a stud*.
Stone Preparation
Lay stone out on a flat surface near to the application area. Always blend stones together from different pallets to prevent minor color variances from being noticeable. Ensure stone is clean and free of dirt and dust. In colder climates, ensure stone remains at temperatures above freezing 48 hours prior to installing.
Plan for some contrast and variety. Mix colors, sizes, shapes, thickness, and textures to create unique and natural finishes. Blending together different Kettle Valley Stone Company Thin Veneers can achieve a customized look.
Mortar Preparation
Type M or S masonry cement to be used. A bonding agent is to be added to the masonry cement while mixing at a ratio of 4 oz. to 1 standard bag of cement. When mixing and using the mortar, the mortar should be firm yet moist. Dry-crumbly mortar requires more water, while drippy-soggy mortar needs to have more mix added. Consistency is correct when you apply a stone to the wall and the mortar firmly oozes around the stone but does not roll or creep over the face of the stone while you are pressing the stone into the wall. Throughout the installation procedure ensure that the mortar mix remains consistent. Only mix the amount of mortar you will be using immediately.
Re-tempering of the mortar is not allowed. Mortar that sits for more than two hours must not be used. For some applications and designs, the addition of colors and pigments to the mortar will enhance the overall look of the stone. In some applications a Thin Set Mortar base may be required and should be used as per Thin Set manufacturer's recommendations*.
Installation of Thin Veneer Onto Prepared Surface
Once the installation of stone has begun, do not allow any construction to occur on the opposite side of the wall for a period of 72 hours after completion of the installation process.
Moisture Control
Cladding systems such as stone are not waterproof and despite their considerable durability, sound building ethnology requires keeping liquid water from penetrating exterior walls. Building papers and house-wraps are a well established way of providing some protection but they need to be augmented with the combination of air flow & water drainage.
Select a product that will provide a secondary plane of moisture resistance to resist inward moisture transport. Products such
as "Waterway" by www.stucoflex.com; "Mortairvent" by www.advancedflashing.com; and / or "Delta-Dry" by www.cosella-dorken.com are suggested. These products are well engineered, readily available and must be installed according the manufactures Instructions as an intermediary layer between the initial building paper & the metal lathe components.